Twisted Prism Lamps and CRASH THE PLANET

April 2, 2016 was CRASH Space’s first art show, and it went really well. We had tons of exhibits and a lot of people who came out to see it. Needless to say, it will happen again.


For the show, I made a set of twisted prism lamps, which are 3d printed, assembled with dremel friction welding, and contain rgb LEDs and motion sensors hooked up to an Arduino. I dedicated two whole Barb Makes Things videos to the creation of those, because they were rather involved. You can see the videos below or on my YouTube channel, and I also put together a video of a bunch of exhibits at the event (including some footage of my completed lamps), which is also below.


Barb Makes Things – How To: 3D Filament Rivets

You might have noticed that I use 3d printing filament frequently for attaching items together (particularly 3d printed ones that need a hinge, like the scissor mechanism on my Poking Device). I’ve made a quick How To video for my channel about the technique. Check it out below!


Let me know what other How Tos you’d be interested in seeing.


Barb Makes Things: 3D Printed Poking Device

DSC01745 copyIt’s Tuesday again, which means a new video. In this one, I recreate a 3d printed device I made for a previous Halloween costume, about 2/3 size and printed with stainless steel filament. It is a poking device mounted on a scissor mechanism. I mean, really, why not?


I also posted a full instructable for my Layered Wood Pendant Necklace video.


CRASHspace Signs

If you haven’t gathered, Crashspace is my hackerspace home, and the signs on the room doors were in dire need of update. (“Dante cleaned Shop One! Yay, Dante! Wait, which one is that?”) There were signs, but they were subtle printings on paper, which no one ever looked at.


So I made some new signs that are tool-specific to each room. Lasercut acrylic for Shop One, CNC router for Shop Two, and 3d printed for the Library. As I am wont to do, I made some tweaks in Illustrator of Peralta (one of my favorite fonts), and then translated it for the three different tools. Note: I did a little cleanup on the Shop Two sign, this picture shows it fresh off the router.


Now if you don’t know which room is which, you’ll be directed to the big, obvious, lovely signs on the doors.


https://farm8.staticflickr.com/7335/16199540699_938e5283df.jpg
CRASHspace Shop Two sign
CRASHspace Library sign


State of the Makin

I’ve done a lot of instructables lately. Last week was the end of their Makerspace competition, which had a lot of fabulous entries, and our very own CRASHspace won with my Hexachord instructable. Woohoo! My Light-up Hobbit Papercut Bookmark also won second prize in the papercraft contest.


Which is not to say that I haven’t been creating physical things as well. The CNC router is just too much fun to leave alone, and I’ve made a couple wood signs, including this in-progress one of one of my favorite quotes from Steal Like an Artist. More pictures when it’s done.


B88TpqvIQAAvTas IMG 6262


We’ve also been using a lot of T-Glase filament in the Bukito 3D printer, which is transparent(ish) and awesome for things like hanging air plant terrariums. Here’s the STL of the terrarium I designed in the picture above (where the clear filament looks more like silver). Oh, how I’d love to play with a resin printer.


This spring break and summer, I’ll be running the reDiscover Center’s Tinkering Camps, for which we have all kinds of fun plans, and starting this coming Saturday, February 7th, I’ll be doing Tinkering Studio afternoons as well. I am super excited about these upcoming events!

3D Modeling

Crashspace has been hosting a number of Instructables Build Nights lately, in which we’re sent a package of new tools or technologies to play with and use for making tutorials for the Instructables site. They get advertising and a greater project presence online, we get to host free events with the latest stuff. It’s fun.


3D Printed Spark.io DiffuserFor November, we did a Build Night using the new(ish) Spark.io technology, including Spark Cores and their not-currently-available Internet Buttons. The basic gist is that they’re wifi-enabled microcontrollers that hook up to their cloud and let you do “Internet of Things” projects. Think toaster that prints the weather forecast on your breakfast. As it’s a fairly new product, there are still glitches, so it was a bit of a slog to get them working. But that means that we’ve put together more detailed instructions for starting out.


I am systematically attacking all of the tools and media available at Crashspace, in my perennial quest for world domination generalist maker skills. For the last few months I’ve been buried largely in the 3d printers and 3d modeling software. For many reasons, I’ve focused largely on Autodesk’s 123D Design (and a bit of Blender), and most of the things I print are my own designs. I like the mix of virtual and physical, and I like spending time with my beloved calipers. 


In any case, I posted an instructable for a couple 3d printed diffusers I designed and printed for the Spark.io Build Night. They were a hit. The instructable shows how to make the model that I did, but the real aim is to show how to design a case/diffuser for a different device.


Another recent project is creation of a hybrid car badge for the limited release Rav4 Toyota/Tesla collaboration. The modeling stage is done, it’s been printed, acetone vapor bathed, and made smooth with a sandable primer, and I’m currently in the middle of an education on molding and chrome plating. 


Soon, I’ll be posting a new tutorial for a Chibitronics Papercut Bookmark that I made for my dad for Christmas.

Koi/Whale 3D-Print Model

3D Printed Big Fish


I’ve spent a lot of time lately in Autodesk’s 123D Series. This is something I modeled in 123D Design the other day.  It was originally intended to be a koi fish, but it looks a bit like a whale.  Oh well, I still like it.  Download, print, and enjoy.


This critter was printed on a Bukobot at Crashspace, using gold PLA.


You can find it at thingiverse.

Latest: Hair Stick, Sofa Foot Box, and 3D Printed Monster

Lots of making recently.  My Dremel tinkering continues, in the form of a two-pronged hair stick (which works pretty well, and doesn’t pull on my hair as much as a regular hair tie), and a wooden box made from the repurposed foot of a sofa.


The hair stick was a straightforward process, a matter of drawing the desired shape on the top, and on the side, and then using the dremel tools (and scroll saw to start with) to carve it down to the desired shape.  I used some wenge wood, which is nicely solid (less likely to snap) and pretty.  It also smells really nice, incidentally, but I plan to lacquer the thing.  You’ll see in the sofa foot box, I got into a bit of marquetry, and am considering doing a little decoration on the wide end of this hair stick.  The color of it disappears a bit in my dark blond hair; putting a finish on and adding some patterned details should help.


Hair pin cut Hairpin w flowers Hairpin side Hairpin in hair


The full process of making my Repurposed Sofa Foot Box (with Bonus Marquetry) can be found on Instructables.  It’s pretty fun, and a good project for getting accustomed to the dremel Multi-Max.  It’s mostly made from used parts, except for the hinges.  Had I time, I would have made wooden hinges for it, from that same lovely wenge.  Wooden hinges and associated Instructable, future project.


Box fin back side Box fin redback


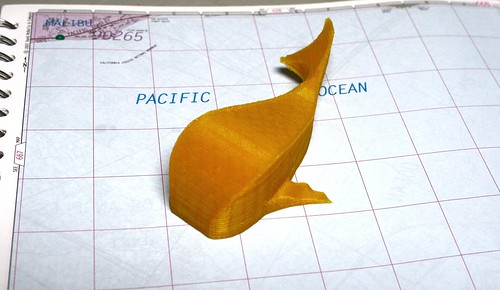
3D printing is something I haven’t done much since last year at the Exploratory on the Replicator 2.  Lately, I’ve been playing with 123D Design (lots of other software options out there to explore too), and recently put together this little monster based on a papercut I did a while back on hitRECord.  It’s largely an extrusion of a 2D image (exported from Illustrator to .svg and imported to 123D Design – in case you were wondering how to do that), with some adjustments to the edges, and holes for articulated arms.  There’s a bit of an overhang issue at those cut out spots, but it’s small enough and loose enough as to not cause a major problem.  I’ll probably come up with a different solution for the next version, especially as it’d be nice to have the limbs extend further into the body, which will require larger holes.  I attached the limbs with wire, curled at either end.  Another option would be to use a piece of filament and melt it at either end to hold the joints in place.  I shall experiment and let you know.


Monster printing Monster on bed monster on tiptoe


Instructables bot

Next on my plate is designing a 3d printed bot with a crank and various other mechanisms. I might make it look like the Instructables robot, cuz that thing is cute and looks like it should be moving.