Tinkering is an activity, a skill, a way of life. It has so much value when it’s open-ended. A big part of its value for adults is that it requires letting go of the “I’m not creative, I need discrete instructions” mindset. Something for adults to consider is that children can do it, and they don’t have the slightest doubt that they can. Adults, you were once children, it was once your job to tinker. You’ve only forgotten that you can.
Hmm, I wonder what this does.
Tinkering can also be a more intentional process. That’s where prototyping lives, between making and tinkering.
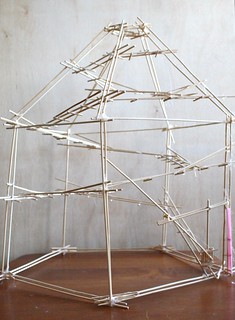
I have a standard toolkit for tinkering. It’s the set of materials I pull out when I want to tinker with an idea or do a super quick prototype for a specific project. It’s also the basic set I bring along to tinkering classes and events with kids. Other folks (particularly those in specialized fields) might use different items, some might use more expensive things. When I’m playing, I like to not have to worry about the cost or availability of my materials. It’s okay if I break something, or waste a bunch in a “failed” attempt (though, there is no failure in tinkering, there are only learning experiences), because I can grab some more and try again. So most of the things you’ll find in my ever-expanding tinkering toolbox are inexpensive and/or available in bulk.
I should point out that this particular toolkit doesn’t include electronics, or recycled materials. Those are lists for another day.
Consumables
- Bamboo Skewers
- So useful. So so useful. With a pair of snips and a hot glue gun, you can make more shapes than you can shake a stick at. (bad pun intended)
- Cardboard
- Cheap/free and somewhat flexible. Some might complain about it not being super solid, but take a material for what it is. There are times and places for sturdy cardboard. Depending on how it’s constructed, you can find cardboard that will hold a shape fairly well, but it can also be especially useful for its flexibility. A piece of moderately flexible cardboard folded up can make a decent approximation of a spring.
- Hot Glue
- I’ll list a hot glue gun under tools, but the hot glue itself can be a material. It’s great for making quick little shapes, it diffuses light from LEDs nicely, and pressing a motor shaft into a piece of a glue stick is an easy way to attach a light load to a motor should you not have the exact shaft collar on hand.
- Duct/Paper/Gaff Tape
- Same deal as hot glue. It can be a material and not just a method of attachment. Doubled over duct tape makes a good tab. If you’re slick about it, you can fashion a functioning belt from gaffer tape (as introduced to me by the fabulous Carlyn Maw).
- Shrink Plastic
- You can get a piece of hard material and cut it with power tools until you get the shape you want, or you can take shrink plastic, cut it with normal scissors, and toss it in the oven to get a quick, hard piece of plastic in whatever shape you like. It’s not 100 percent precise (some plastics works more consistently than others), but this is tinkering/prototyping. It’s not meant to be. Shrink plastic will get you close enough for a lot of tinkering and rough prototyping.
- Rubber Bands
- These are a good stand-in for springs or any tightened cord. Also can be quite handy when you want a soft connection that has a little give.
- Straws
- Both thin and fat (boba) straws. Among other purposes, thin straws can help create axles for hinges and wheels, and fat ones are good for self-straightening bendy joints.
- Zip Ties
- Another attacher/material. They provide a good resistant but bendy connection.
- String
- Paper
- Multiple colors. Cardstock is particularly useful.
- Random Doodads
- Little (or big) shapes of metal/wood/plastic/what-have-you that don’t have a related purpose. It’s exciting to bring items that you have no ideas for whatsoever to an event (especially one with kids), because they will think of a use for them that will surprise you. Working with kids is always surprising.
Tools
- Good Scissors
- Trying to cut things with crummy scissors is a pain and a half. You might also consider having separate pairs for coarse vs fine materials, the same way every sewing aficionado has dedicated fabric scissors that ARE NOT used for anything else.
- Wire Cutters/Snips
- Good for wires, good for skewers (scissors are a poor substitute and can be damaged by heavier materials), good for anything that needs more of a chop than scissors.
- Pliers
- You never know when you’ll need a better grip, to crimp wires, or to bend something stiff.
- Dual-temp Hot Glue Gun
- The dual-temp aspect is relevant. Low temp settings are good for a glob of hot glue that holds its shape when joining objects, the high temp settings are good for making stronger bonds, but also make the glue drippy.
- Sharpies
- Permanent markers that will draw and stay on anything always make the list.
- Toaster Oven
- Power Drill and Bit Set
- There isn’t much by way of power tools on this list, and it’s a more luxury item than most other things here, but I adore my power drills, and always have one within arm’s reach, in case I need to make a quick, clean hole in wood, plastic, or cardboard.
This is hardly a full list, but it is good for starters. Leave a note if you have suggestions that you’ve found useful!
As a footnote, there are a few things that I do not bring when working with kids, because of their propensity for suppressing creativity.
- Stickers
- Of the pre-made, fully-designed variety. Yes, they can be great fun. But when you’re creating, unless you need it for a specific purpose, like a logo, it can act as a stop button for one’s imagination.
- Glitter, Glitter Glue, Sparkly Things
- Sparkly things are like sugar. Especially when working with kids, you give them something shiny, they will grab and consume it by the cupful, and it will overpower any other flavors they’ve put into their project. Sugar is meant to be used in moderation. If you want shinies, decide specifically where and why before pulling them out.
